CAS Colours & Sketches Challenge #257 – The Double

Hello there!

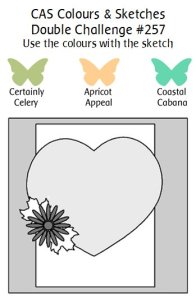
Since it’s the fifth week in January, we are having the double challenge at CAS Colours & Sketches.

This week our hostess, Beverley, has chosen a previous CC&S sketch and some retired Stampin’ Up! colors to inspire us. (tap the figure below for the details at CC&S)

double 257559349100..jpg

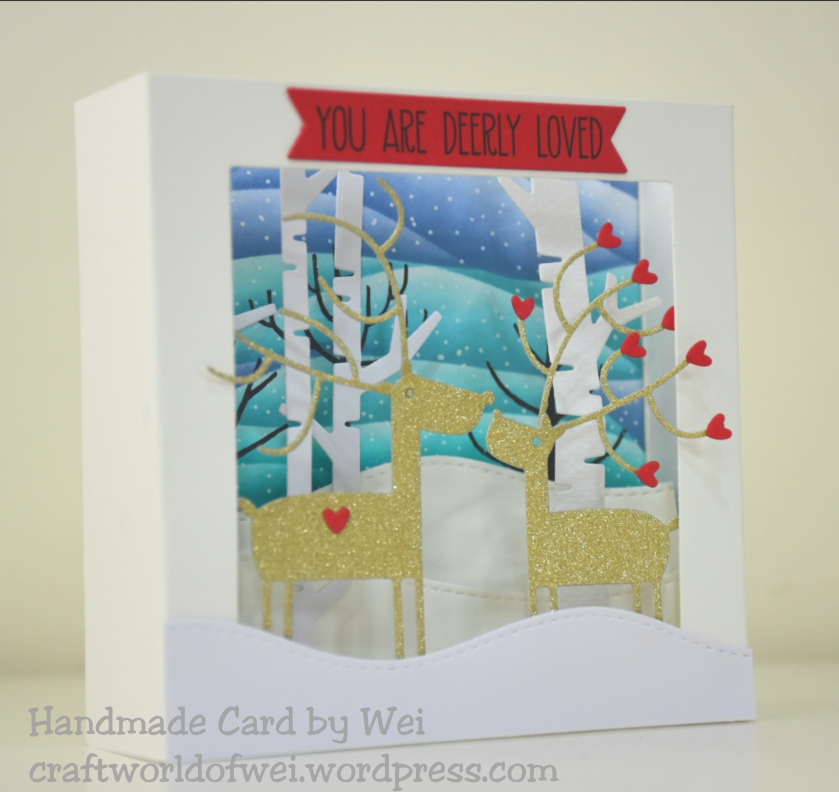
Here is how I’ve used the sketch and the color combo…

  1. Create a top-fold A2 card base.
  2. Die cut a Stitched Rectangle from Green Watercolor patterned paper, stamp the sentiment on the botton and adhere to the card base.
  3. Die cut a Stitched Heart from Roses All Over patterned paper.
  4. Die cut the solid and lace butterfly from white card stock. Color the solid butterfly with Copic markers. Layer the lace butterfly with foam tape on the solid one.
  5. Arrange and layer the heart and butterfly on A2 card base.

Thank you for spending some time with me.

I hope you can head on over to the CC&S blog to enter the challenge and to see more inspiration from the awesome Design Team.

You Are Deerly Loved

Hello there!

Today I am sharing a shadow box featuring a winter scene.

photogrid_15172933750691859646132.png

photogrid_1517293427919701202340.png

photogrid_1517293477637744152522.png

Here is how I’ve created…

  1. The box was assembled with two pieces of white card stock.
  2. The background was stenciled with Distress Oxide inks. Stamp the Modern Trees and dot the snow with a white jelly pen on the background.
  3. The birch trees and snowdrifts were die cut from white paper.
  4. The deers were die cut from gold sparkle card stock.
  5. The tiny hearts were die cut from red card stock.
  6. All the pieces were layer up with double sided tapes.

It’s my first attempt to create a shadow box and it took me hours to finish it. Although it’s a little tricky, but I have an idea to create anothet one for the upcoming Chinese New Year!

It’s for the entry of

Tia Tac Toe Challenge #32photogrid_1517294560740750188272.pngMake My Monday Challenge #63 Fancy Folds

Deep Ocean Challenge #173 Let it Snow

The Holly and Ivy Christmas Challenge #22 A.T.G.

ABC Christmas Challenge – A is for Antlers

SSS Wed. Challenge : Layer It Up

The Sisterhood of Crafters – Dashing Through the Snow

Craft Rocket Challenge #44 Winter

Thanks for spending some time with me and I hope you can revisit my blog again.

HI-YA!

Hello there!

Today I am sharing a single layer card following the sketch from CAS(E) this Sketch.

cts_256549741675.jpg

I tried to add movement by stamping the image several times in lighter shade and using masking technique.

I colored the images with Copic markers: 100, C7, C5, C3, C1; R29, R27, R24, R22, R20; E02, E01, E00, E000, E50.

It’s for the entry of

Less is More Challenge #363 OLC Cute

CAS(E) this Sketch #256

I seldom created one layer card because I am not good at  fussy cutting. For joining the challenge at Less is More, I did try to create a single layer card few days ago. But I forgot the rules at LIM, the one I created will be disqualified. I think it is nice to tell a participant that I’ve broken the rules in the comment. Then I can fix my entry for the next time and make it better!

Thanks for spending some time with me and I hope you can revisit my blog again.

Let’s Chill

Hello there!

Today I am sharing a card featuring masking technique.

Here is how I’ve created…

  1. Create a top-fold A2 card base.
  2. Trim mask paper to 4.25″ x 5.5″ and die cut a square window. Adhere it to A2 card base.
  3. Stamp the penguin on the card base with mask tape to mask the penguin’s feet and color the penguin with Copic markers.
  4. Stamp and cut  the penguin from mask paper. Mask the penguin on card base.
  5. Position Cloud Stencil upside down and blend Salty Ocean Distress Oxide ink to create the wave.
  6. Blend Tumble Glass Distress ink with Mini Cloud Stencil to create the sky.
  7. Peel off mask paper and stamp the sentiment on card base.

It’s for the entry of

Less is More Challenge #363 OLC Cute

AAA Cards CAS Game #107 Chilled

Lemon Shortbread Challenge #59 Anything Goes

Addicted to Stamps and More Challenge #276 Anything Goes

Color Throwdown #477

Mix It Up Challenge #9 Anything Goes + Masking

Crafty Animals #10 Anything Goes

Moving Along With the Times #63 Clean & Simple

It’s Your Birthday!

Hello there!

Today I am sharing a birthday card following the sketch from My Favorite Things.

Here is how I’ve used the sketch…

  1. Create a top-fold A2 card base.
  2. Die cut a circle from watercolor paper. Blend Tumble Glass Distress ink with Mini Cloud Stencil on the circle.
  3. Die cut Celebrate circle frame from Summer Splash card stock.
  4. Stamp, color and die cut the sheep.
  5. Stamp the sentiment on gray card stock and die cut.
  6. Layer all the pieces on A2 card base.
  7. Decorate with Nuvo Crystal Drops.

It’s for the entry of

City Crafter Challenge #396 Balloons

Lemon Shortbread Challenge #59 Anything Goes

Shopping Our Stash #338 You say it’s your Birthday!

Addicted to Stamps and More Challenge #276 Anything Goes

Color Throwdown #477

Simon Says Stamp Wed. Challenge Layer It Up

Moving Along With the Times #63 Clean & Simple

Forever is a long Time……

Hello there!

Today I am back to share another card for Valentine’s Day. I chose the top row across of the Tic Tac Toe challenge to creat it.

Here is how I’ve created…

  1. Create a top-fold A2 card base. Stamp mini heart background with Worn Lipstick Distress Oxide ink.
  2. Die cut an oval from white card stock. Stamp the sentiment with Pink to Red Ombre ink.
  3. Die cut a scallop oval from red card stock & frame the sentimental oval.
  4. Stamp, color and die cut the tiny birds.
  5. Arrange and layer all the pieces on A2 card base.
  6. Decorate with Nuvo Red Berry Crystal drops.

It’s for the entry of

Tic Tac Toe Challenge #31

C.R.A.F.T. Challenge #451 Love/Valentines

Simon Says Stamp Wed. Challenge – Add A Sentiment

Thank you for spending some time with me and I hope you can revisit my blog again.

CAS Colours & Sketches Challenge #256 – Sketch

Hello there!

Since it’s the fourth week of the month, we are having a sketch challenge at CAS Colours & Sketches.

This week our hostess, Beverley, has come up with a fun sketch to inspire us. (tap the figure below for the details at CC&S)

Here is how I’ve used the sketch…

  1. Create a top-fold A2 card base.
  2. Die cut a Wonky Stitched Rectangle from Blu-Raspberry card stock as the front panel, then adhere to the card base.
  3. Die cut a circle from watercolor paper. Blend Tumble Glass Distress ink with Mini Cloud Stencil on the circle and adhere to the front panel.
  4. Die cut the grassy hills from green card stock & blend Mowed Lawn Distress ink on the edge.
  5. Stamp, color and die cut the sheep and cloud. 
  6. Layer all the images and grassy hills on the stenciled circle.
  7. Die cut a scallop circle frame from white card stock and frame the scene.
  8. Decorate with a heart between the sheep.

Thank you for spending some time with me.

I hope you can head on over to the CC&S blog to enter the challenge and to see more inspiration from the awesome Design Team.

It’s alsfor the entry of 

C.R.A.F.T. Challenge #451 Love/Valentines

Simon Says Stamp Wed. Challenge – Add A Sentiment

Cute Card Thursday Challenge #513 Something Fun

Moving Along With the Times #63 Simple & Clean

CAS on Friday #124 Love

Lemon Shortbread Challenge #59 Anything Goes

Crafty Animals Challenge #10 Anything Goes

Mix It Up Challenge #9 Anything Goes + Masking

You Hold the Key to My Heart

Hello there!

Today I am sharing another Valentine’s Day Card following the sketch from Freshly Made Sketches and photo inspiration from Hand Stamped Sentiments.

Here is how I’ve used the sketch…

  1. Creat a top-fold A2 card base.
  2. Die cut the heart frame form gold shine card stock.
  3. Die cut the heart and lock from red shine card stock.
  4. Die cut the key from silver sparkle card stock.
  5. Arrange the pieces and adhere to A2 card base.
  6. Stamp the sentiment with black ink on A2 card base.

It’s for the entry of

Freshly Made Sketches #320

Hand Stamped Sentiments #281 Inspiration Challenge

CAS on Friday #124 Love

Welcome to the World, Star!

Hello there!

Today I am sharing a baby card for a girl who is going to be a mom. She was my student when she was fifteen. And we have kept in touch with each other for fifteen years. I am so happy for her that she has  married to a wonderful gentleman. They will have a baby boy who was nicknamed Star!

I want to make some cookies on the card for the little baby boy Star!

Here is how I’ve created my card…

  1. Creat an A2 card base and stamp the sentiment with black ink on card base.
  2. Die cut scallop circles from Kraft card stock as cookies.
  3. Die cut circles smaller the the scallop ones from white and blue card stock as icing on the cookies. Adhere to the scallop circles.
  4. Die cut baby clothes and tiny stars from white and blue card stock as decoration on cookies. Adhere to the icing.
  5. Arrange the cookies and adhere to A2 card base.

It’s for the entry of

Thanks for spending some time with me and I hope you can revisit my blog again.

I Love Spending Time With You

Hello there!

Today I am sharing a Valentine’s Day card following the sketch from My Favorite Things.

Here is how I’ve used the sketch…

  1. Create a top-fold A2 card base.
  2. Die cut a Mod Rectangle from Blu-Raspberry card stock as the front panel.
  3. Die cut a circle window from the front panel and stamp the sentiment with black ink.
  4. Die cut the starry circle from watercolor paper. Blend Distress Oxide inks on the starry circle.
  5. Die cut a circle from silver sparkle card stock & adhere it to the back of the starry circle.
  6. Die cut a smaller circle from watercolor paper and blend Mustard Seed Distress ink on it as the moon.
  7. Stamp, color and die cut the images.
  8. Layer all the pieces on A2 card base.

It’s for the entry of 

Thanks for spending some time with me and I hope you can revisit my blog again.