Happy Birthday

Hi there!

Today I am sharing a birthday card with watercolor background.

I picked three watercolors in blue tone to finish the background. The sentiment was die cut from white card stock five times and  layed for the dimension.

It’s my girl, Linda’s 10th birthday today. I can’t imagine that she is TEN years old.

We are going to take her to a restaurant for celebrating.

It’s for the entry of

CARDS in ENVY – Typography Card Challenge

I am back to add some pictures we took in the restaurant.

Linda really loves the sketch her daddy drew on the paper tablecloth.

Cheers To The New Year

Hi there!

After creating several X’mas cards, I am sharing a New Year’s card (still holiday cards, LOL).

  1. New York skyline was die cut from black card stock & gold shine card stock.
  2. The two pieces were layerd with a little shift.
  3. The sentiments were gold embossed.
  4. The fireworks were stenciled with Delicata metallic inks on black card stock as the background.
  5. The skyline was adhered with foam tapes on the background for adding some dimension.

It’s for the entry of 

AAA Cards CAS Challenge – Celebrate

Less is More Challenge -Fireworks

Actually, it’s the 2nd version. For entering CAS card challenges, the 2nd one was kept more “WHITE SPACE".

Here is the first one I created.

Which one do you like the most?

Snowflake Spinner

Hello there!

Today I am sharing an interactive X’mas card which I did once last year.

All the supplies I used are listed here:

  1. White card stock
  2. A piece of clear thread
  3. MFT Stylish Snowflakes Die-Namics
  4. MFT Circle STAX Die-Namics Set 2
  5. MFT Tree Lines Die-Namics
  6. MFT Hand-Lettered Christmas
  7. Sizzix Snowflake Embossing Folder

You can watch the tutorial video here from Stephanie who is one of the DT of My Favorite Things.

It’s for the entry of

MFT Wed. Sketch Challenge – Sketch 358

Simon Says Stamp Wed. Challenge : Snow White

Christmas Card Throwdown

ABC Christmas Challenge – W for White

CRAFT ROCKET CHALLENGES #43 Christmas is Coming

Merriest Wishes

Hello there,

I am here sharing the 2nd hand stitched card.

I am kind of obsessed with stitching lately because of MFT Cross-Stitch Tag Die-namics.

You can download cross-stitch patterns on MFT’ s website here or creat your own patterns.I am new to cross-stitching so I use the patterns which were offered by MFT. Actually, you can find a lot patterns by Google “Cross stitch pattern".

Here is the card for a dear friend who is obsessed with PURPLEs. Hope she will love it!

It’s for the entry of

Christmas Cards All Year ‘Round – November Challenge

Christmas Card Throwdown

CRAFT ROCKET CHALLENGES #43 Christmas is Coming

You’re Always On My Nice List

Hello there,

I am sharing a X’mas card today.

  1. The background was embossed by Sizzix embossibg folder I got years ago.
  2. Merry Christmas circle frame was die cut from Gold Shine card stock.
  3. Santa was stamped with black ink, colored with Copic markers and die cut with the coordinating die.
  4. The stitched snow drifts were die cut from watercolor paper.
  5. All the pieces were combined to fit the sketch below.

Do you notice that Santa is holding a heart on his hand?

Hope you will love it!

It’s for the entry of

MFT Wed. Sketch Challenge – Sketch 358

Simon Says Stamp Wed. Challenge – Snow White

CRAFT ROCKET CHALLENGES #43 Christmas is Coming

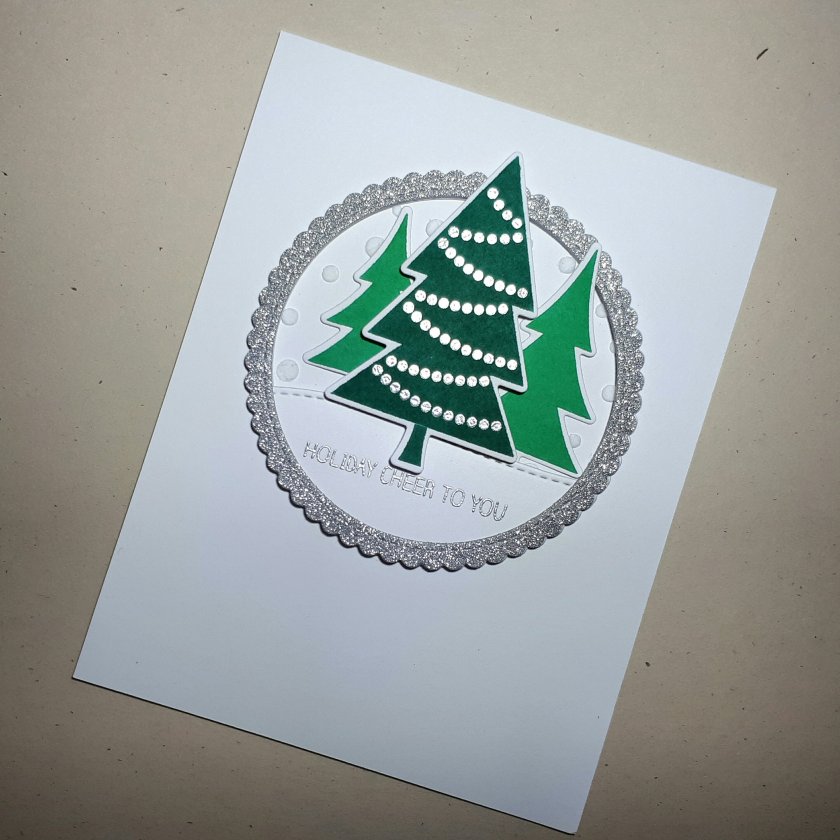
Holiday Cheer to You

Hello there,

I am sharing another X’mas card with X’mas trees today.

  1. The A2 card base was masked for a circular space and stenciled in embossing paste with MFT Snowfall Stencil.
  2. The ornaments on the bigger tree was first stamped with VersaMark and silver embossed, then the tree was solid stamped on the coordinating position with pine needle Distress ink and die cut out.
  3. The two smaller tress were stamped with lucky clover Distress ink and cut with the coordinating dies.
  4. The circle scallop edge frame was die cut from silver sparkle card stock.
  5. The stitched hill was die cut from white card stock and the sentiment was silver embossed on it.
  6. All the pieces were combined together with glue and foam tapes.

It’s for the entry of

CAS Colours & Sketches Challenge #248

Cross-stitch Tag

Today I am sharing my very first hand stitched tag. I spent morning hours to stitch and I do enjoy the stitching process. I wish I could have more time to stitch more tags for friends.

Here are the supplies I used

  1. MFT Cross-Stitch Tag Die-namics
  2. MFT Snow Globe Sentiments
  3. The cotton strings were bought at a local stationary store.

It’s for the entry of                                                Simon Says Stamp Wednesday Challenge – Christmas Gift Tag

MFT Wed. Sketch Challenge #357 & Color Challenge #80

Today I am sharing a X’mas card with a beast friend.

  1. A rounded rectangle was die cut from a yellow paper and a fishtail banner was die cut from MFT Plaid Patterns paper.
  2. The Merry Christmas circle frame was die cut from MFT Summer Splash cardstock.
  3. The beast friend was stamped with black ink, colored with Copic markers and die cut with the coordinating die.
  4. All the pieces were combined to fit the sketch.

It’s for the entry of

MFT Wed. Sketch Challenge -Sketch 357

MFT Color Challenge #80

Season’s Greetings

Today I am sharing a card with ink blending technique.

  1. Trim the masking paper into A2 size and cut a rectangle from the center of the A2 size masking paper.
  2. Adhere the A2 masking paper onto the watercolor paper.
  3. Watercolor paper was stenciled in Distress inks with MFT Drifts & Hills stencil, then splash some white paint.
  4. Stamp MFT Modern Trees & the sentiment on the hill with black ink, then peel off the masking paper.
  5. Frame the scene with a rectangle frame.

I have to apologize for the sentiment a little shift to the left, but I do love this ink blending result. This is for the entry of AAA Cards Challenge.

Christmas Greetings

I’ve watched Virginia’s tutorial video about watercoloring many many times, and I always wait a perfect moment to creat cards with this technique.  I think it’s time to start with a X’mas card.

The stamps are from                                           Simon Says Stamp Poinsettia.

  1. I dabbed wild honey Distress ink with mini ink blending tool and  sponged on the middle of the solid stamps for the pistil.
  2.  I dabbed abandoned coral Distress ink with mini ink blending tool and sponged on the rest part of the solid stamp.
  3. I sprayed water on the inked stamp, then stamped on watercolor paper.
  4. I dabbed  vintage photo Distress Oxide ink on the outline stamp and stamped on the coordinating position.
  5. I stamped the poinsettia with different colors and added leaves around.

I think I finally finished a pretty X’mas card with these stamps since I got them last X’mas.

It’s also for the entry of Less is More Challenge